Our New House


Wow, wow, wow - it's been a busy, exciting time! I've got so much to blog about. But let's start with...our new house!

We finally bought our own place. After 20 years of renting, this is a major milestone. And we couldn't be happier. We closed last Friday on August 10, our 11 year anniversary. Talk about an anniversary present! There's lots to do as it's an older home, and I have all intentions of sharing everything right here on this blog.

But for now, it's back to unpacking and getting situated and just taking it all in.

Happy Friday!

Featured in Decorating Shortcuts!


I am so excited to be featured in the current issue of Decorating Shortcuts

How did this come about, you ask? Well, several months ago the editors contacted me about this photo that they found on my houzz.com profile:

Amazingly, it has been added to almost 10,000 ideabooks. I'm completely baffled by this!

Since this photo was from our old house, and had been reincarnated already, I suggested that they consider using photos from my new design, as well. I had taken all sorts of befores and afters over the past few years, so they were well stocked with images. They were totally into the idea, and moved forward with the story. I couldn't be more pleased with the final product. It turned out great! (Ironically, the image that first sparked the story wasn't including in the final layout. So goes the world of publishing...)

There's some other good stuff in the mag, too, so make sure you pick up a copy. It'll be on newstands through October 2012.


If you want to turn your home into a photo-worthy project, give me a call at 650.867.3896 or shoot me an email at kelly@artestyling.com.

Bathroom Design Project in Walnut Creek


I finally got around to shooting a bathroom design project I worked on nearly three years ago! As I'm working on my new website, I'm pushing myself to get my portfolio updated. Fellow designers, artists and photographers - you all know how difficult this can be! Fortunately, my clients have been very accommodating. I've still got lots more to shoot, but I'm getting there. 

In the meantime, here are my favorites from this Walnut Creek bath project. There are no before shots because it was new construction.  I do have a couple of design drawings to share though. And, yes, they are hand-drafted and rendered. They aren't going to win any awards, but they were instrumental in the design process. 


Here's a very basic floor plan of the space showing the tile design and bath layout, which was already determined when I came on board.


And an elevation of the vanity. I worked on vanity design, mirror size and placement, lighting size and placement and tile design, as well as colors and materials.

Here's an elevation of the two full walls around the bathtub. It's extremely helpful with tile design to sketch everything out, even if your drawing skills aren't awesome. There's really no better way to help visualize how tile will look when installed. 


And if you can render, it's even better! (Rendering is just designer speak for coloring in a drawing.) As you can see, the colors aren't an exact match to the tiles that were installed, but you do at least get some sort of an idea of how the end result will look in color. I could have spent many more hours on this, but I did it quickly and roughly due to time and budget constraints. 


And here's the shower wall elevations. You may notice that the niche design was altered a little from the drawing. The change was made once the installation was underway, and I think it was a good call on the tile installer's part. 


And here's the rest of the final design photos. 


If you need assistance with a bathroom remodel or addition, please give me a call at 650.867.3896 or shoot me an email at kelly@artestyling.com to discuss your project.

Can You Really Make a Room Bigger with Color?

© Kelly Berg

I get asked this question a lot.

The answer is no. No, you can not make a room bigger with color. No matter what colors you paint your walls, ceiling, trim...no matter what color your drapes and flooring...no matter what color your furniture and accessories, the actual square footage of a space will never change with even the most expertly designed color palette.

However, you've probably noticed I left out the word "appear." What happens when we rephrase the question to read "Can you Really Make a Room Appear Bigger with Color?"

The answer to this question gets a little more complicated.

Yes and no. Yes, there are times when using a particular color or combination of colors can help a space feel grander than it is. Contrary to popular opinion, however, I have never found white to be the antidote to a small-feeling room. My mantra: The bigger the color, the bigger the space. Within reason, of course. In my experience, bigger, bolder colors demand more of our attention and have much more visual volume, or depth, therefore "filling up" a space and giving it the appearance of being larger.

But you're still not going to change the square footage, so the answer is also still no.

But all that aside, when I'm asked this question I usually respond with "Why does the room need to be or appear bigger?"
© Kelly Berg
Most often, size is not the biggest problem. Yes, sometimes it can be. A room can simply be too small to function like it needs to. (But - again - you will not change the usable square footage through color alone.) But more often than not, when someone is concerned about making a room feel bigger, what they usually feel is that it lacks character. That it lacks a mood. That it lacks any sort of interest at all.

And that is where color steps in and does its magic. Because, although it won't be able to add an addition to your master bedroom, it can bring character, mood and interest to a space. It can make your room feel full of life. It can make a space sing. It can make you fall in love. (Yes. In love with a room. It really can happen!) And when you love something, who cares what size it is?


Do you want your space to sing? Give me a call or shoot me an email to discuss your project at 650.867.3896 / kelly@artestyling.com

Adventures of a Stylist (and amateur photographer)

©Kelly Berg

I recently had the fun pleasure of styling - and photographing! -  a few rooms in my friend and colleague Rachel Perls' house. I'm sure you know her - she's the owner and color expert over at Hue Consulting. We've worked together quite a bit over the past few years on various projects, and her blog, one of the very first in the world of color, was a huge inspiration for me when I first began blogging myself.
Rachel lives in a great Spanish/Mediterranean style house in Oakland near the Berkeley border. She had painted some terrific colors on the walls, but as a busy mom running after a two year old, she was struggling to find the time and energy to create more cohesively designed spaces. Knowing that her wall colors could be an amazing addition to her architectural color portfolio, she asked me if I could help her whip the place into a more photo-worthy condition. I happily agreed to help. 


Rachel just blogged about her experience here: The Next Layer After Color. I thought it'd be fun to also share my side of the process.
Me, the amateur photographer. © Rachel Perls
Let me start by saying this was a speed styling session. Something that isn't unfamiliar to me, as I have quite a bit of styling experience from the early days of my design career. It's not easy - it's definitely an artistic skill that comes with lots of practice. I told Rachel we could have done so much more and that I considered this the "first phase." I think that scared her. She might have experienced enough styling for now.

Usually, when I style for a client, I do all the shopping and returns. I schlep everything to my client's home and schlep everything back that doesn't end up getting used. I had the luxury of sending Rachel on her own shopping excursion. She sent me photos of the spaces she wanted to get photos of, and I directed her to specific items in specific styles and colors. It was a little difficult to give up shopping control, because a lot of times I just don't know what will work until I see it. But Rachel did a great job. And I was not sad to miss out on making returns (my most un-favorite part of styling gigs.)

Before ©Rachel Perls
Here's Rachel's living room pre-styling. Great wall color, fun rug, very purple sofas...and a dog named Lucy.

One of the main problems I saw with this space was that it read very chunky. There's a block of yellow, a block of red and a block of purple, and nothing is balanced properly. Also, the deep pillows on the deep sofa were getting lost. Lighter pillows and throws in yellows and creams would help tremendously. And a little texture was needed to tie in that rug a bit more. Oh, and we definitely needed to add a more Mediterranean/Spanish feel. We were lacking a clearly supported design concept. 

After some shopping and styling and light adjustments for the photo, here are the living room photos we ended up with.

After © Kelly Berg

Before © Rachel Perls
After © Kelly Berg
I have to say, this was a tough room to shoot for this amateur photographer. The lighting was a bugger! And the yellow walls were glowing sooooo much more in the photos than in real life. It was good experience for me to shoot an interior like this, but just another layer to be considered when trying to create portfolio-worthy pics. My best advice? Take loads of photos and keep playing with the manual camera settings. (Yes, you'll need a camera with manual settings. And don't use the flash. Ever.)


And here's a shot of the dining area before I got my hands on it.

Before © Rachel Perls

Great space, but it needed, like the living area, some design cohesion. Before the big styling day, I suggested Rachel swap out the seat cushion fabric on her dining chairs. The blue and turquoise hues and patterns weren't relating to anything else in the space. She had a great idea to cut down on time - borrow the neighbor's chairs. Worked for me! On the day of styling, I pretty much ordered Rachel around, asking her to produce bowls, vases, runners, plants, etc. etc. She was a very resourceful trooper and we ended up with this:

After © Kelly Berg

After © Kelly Berg

After © Kelly Berg
Very subtle changes, but the new styling allows the wall color to be the center of attention, which is the whole goal when you are trying to sell your services as an architectural color consultant. We didn't need to sell Rachel as an interior designer, so I made sure not to over-style anything.

One of the rooms that Rachel had spent the most time decorating was her daughter's room. This is all too common. I see it over and over again. What is it that spurs us into decorating for our children, but not for ourselves? We know it's important...and we make it a fun process. But somehow, many of us forget that tending to color and design in adult spaces is just as important...and should be just as fun.

Anyway, here's little Nina's room in its before stage. So cute. And Rachel painted that gorgeous dog portrait. She is a very talented artist. 

Before © Rachel Perls
But, it needed a little fine-tuning. So, I suggested swapping out the pillows, losing the black-out curtains and clearing out the clutter. We had gorgeous light when we shot and ended up with these magazine worthy pics.

After © Kelly Berg
After © Kelly Berg
After © Kelly Berg
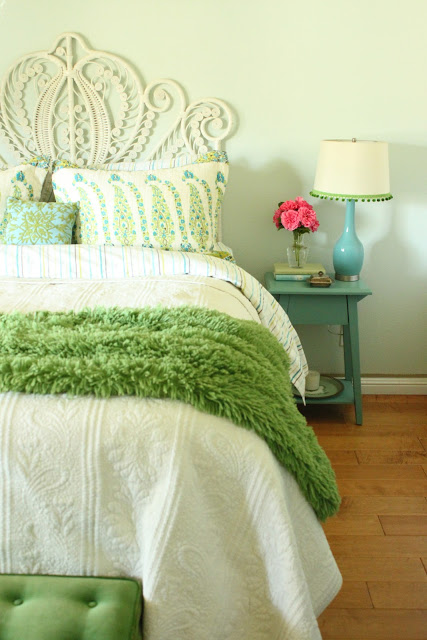
The final room we styled was the master bedroom. Rachel had recently painted it a soft, velvety shade of pink, but was a little stumped on how to proceed. She consulted with me awhile back on bedding, and I suggested a creamy white duvet with a good amount of texture. Between the two of us, we landed on the pintuck style bedding. But we still needed more.

Before © Rachel Perls
It didn't take long for me to see that this bed was on the wrong wall entirely. It felt completely unbalanced and a bit unsettling in this location, being halfway under the window, halfway not. I strongly suggested she move the bed to the opposite wall. Not just for the shoot, but for living. Rachel obliged. She had purchased one super-cute pillow online. It looks a little lonely there, doesn't it? We did our best in this room, but the fact of the matter is, there now needs to be something more on the big empty wall over the bed. Headboard, art, decorative painting...it's very bare right now. Regardless, we still got a few beautiful shots. The lighting cooperated with us beautifully in this space, and Rachel's new wall color looks amazing...don't you think?

After © Kelly Berg
After © Kelly Berg 
After © Kelly Berg

So there's a little behind the scenes of an informal photo shoot. You can see there really is an art to photo styling. It is different than interior design in some ways, although the same basic principles are applied. It's about balance and light and mood. But it's also about thinking on your feet and making things look good on camera even if they don't look quite right in real life. Fortunately for most of Rachel's shoot, I had a good foundation to work with. 

Thanks for the opportunity, Rachel! I hope you are enjoying your "new"spaces!


Need help styling your home? Give me call at 650.867.3896 or send me an email at kelly@artestyling.com to discuss your project.

Napa Guest Room Color Makeover


Here's one of my latest color consulting gigs - my parents' guest room! 


This is the how the room looked for a long time, before I got my hands on it. 


Then, about 5 years ago, my parents gladly donated the use of the room for a magazine project I was hired for. See those crazy striped drapes? I made them with iron-on fabric tape and grosgrain ribbon.   We had a full-on photo shoot at the house, but the story got killed and never went to print. I was pretty bummed, but looking at it now, I'm not surprised!!


The wall color at the time was Silver Mist by Benjamin Moore. It was very lovely. So lovely that I was surprised when my mom asked me to help her select a new color.  It was time to repaint - there was some wear and tear - and she wanted something a little more saturated. We have added so much more saturated color throughout the house since this room was first painted that the color was feeling very pale in comparison. 

So, I reached for the Benjamin Moore Color Stories deck, which I have been having lots of success with, and landed on a slightly deeper, slightly greener blue - St. John Blue. It turned out great, and was just the change they were looking for.

Now what can we do about a headboard? I think I've just discovered a new project for my dad. 


Need help selecting the perfect colors for your home? Give me call at 650.867.3896 or send me an email at kelly@artestyling.com to discuss your project.